Custom Fields
Custom fields, available for any vault item type, allow you to store additional well-structured data fields for a vault item. Custom fields are saved as Name:Value pairs, and can be one of four types:
Text: Field value stores a freeform input (text, numbers, and more).
Hidden: Field value stores freeform input that is hidden from view (particularly useful for organizations using the Hide Password access control).
Boolean: Field value stores a boolean value (true/false).
Linked: Field value is linked to the item's username or password. Given the right field name, linked custom fields can be used to solve issues where your browser extension can't autofill usernames and passwords for a particular site (learn more).
tip
Custom fields for keys
In addition to common web service inputs like PINs and security questions, custom fields can be used to store values up to 5000 characters in length, for example RSA 4096-bit SSH keys.
Character limits for custom field values are imposed on the post-encryption character count. For example, a 3383-character RSA-4096 Private SSH key would grow to about 4400-characters when it's encrypted and stored in your Vault.
Custom fields can be added to a vault item from any Bitwarden client using the Custom Fields section of the Edit Item panel:

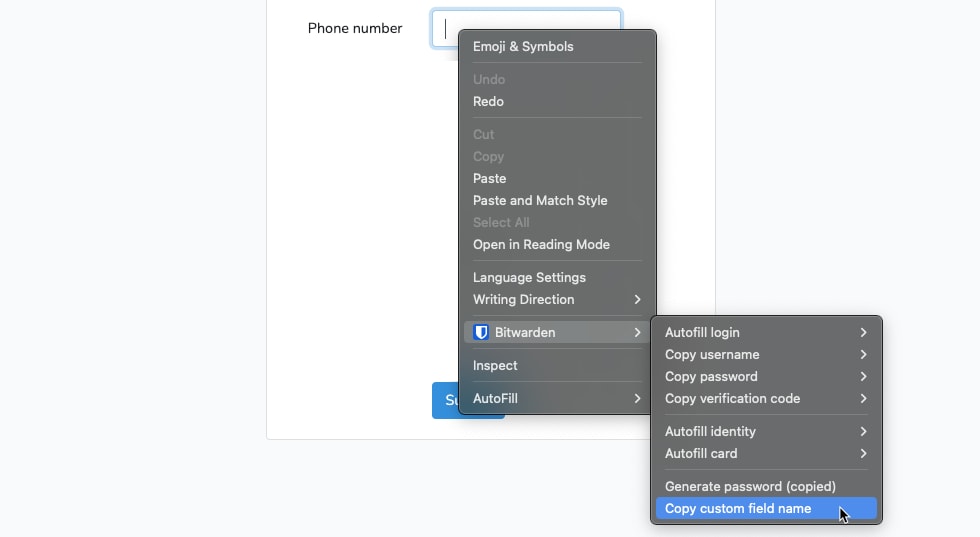
The specified Name is important to get right in order to successfully autofill a custom field. Using the Bitwarden browser extension, you can quickly get the correct field name using the Copy custom field name option in the context menu (in most cases, by right-clicking on the form element):

Selecting this context menu option will copy the form element's id, name, aria-label, or placeholder value (in that order of preference).
Once you have saved a custom field, you can autofill it from the browser extension.
Find custom field names manually
If you don't use the browser extension, the best way to find a field name is to use your web browser's developer tools, as in the following example:

On the webpage with the custom field, right-click the field you want to autofill and select Inspect. The HTML element will open and be highlighted in the developer console.
Find and copy the element
id(findid="xxx", wherexxxis the element'sidvalue).In the relevant vault item's Custom fields section, choose the appropriate field type and select the New custom field button:
Paste the copied element
idin the Name field.Specify the desired information to be autofilled (in the above example, a telephone number) in the Value field.
Save the vault item.
Once you have saved a custom field, you can autofill it from the browser extension.
Order of preference
If you are naming a custom field manually, you should use one of the following HTML form element attributes/values in order of preference:
HTML form element's
idattribute.HTML form element's
nameattribute.HTML form element's
aria-labelattribute.HTML form element's
placeholderattribute.
Matching
Field name matching is an exact and case-insensitive comparison. For example, if your custom field has the name PIN:
Autofill is offered for
pin,PiN,PIN, etc.Autofill is not offered for
pin2ormypin
Prefixing
There are two cases in which you can exercise more control over matching by using prefixes:
csv: Prefixing your custom field's name with
csv=allows you to specify multiple names to search for and compare against for autofill, for examplecsv=pin,mypin,pincode.regex: Prefixing your custom field's name with
regex=allows you to perform regular expression comparisons when auto-fill is performed. For example,regex=^first.*namewill offer autofill forfirstName,First_name, andFirst Name.
Suggest changes to this page
How can we improve this page for you?
For technical, billing, and product questions, please contact support