Import Data to your Vault
Import data to your individual Bitwarden vault for easy migration from any password management solution. You can also import from one Bitwarden vault to another or import an encrypted export.
For a full list of supported import formats, refer to this FAQ item, or use one of these articles for importing from the most popular solutions:
tip
If you need to import to an organization instead of to your individual vault, refer to this article.
Data can be imported to Bitwarden from the web vault, CLI, desktop app, or browser extension. Data is encrypted locally before being sent to the server for storage. To import your data:
To import data to your vault:
Log in to the web vault at https://vault.bitwarden.com, https://vault.bitwarden.eu, or
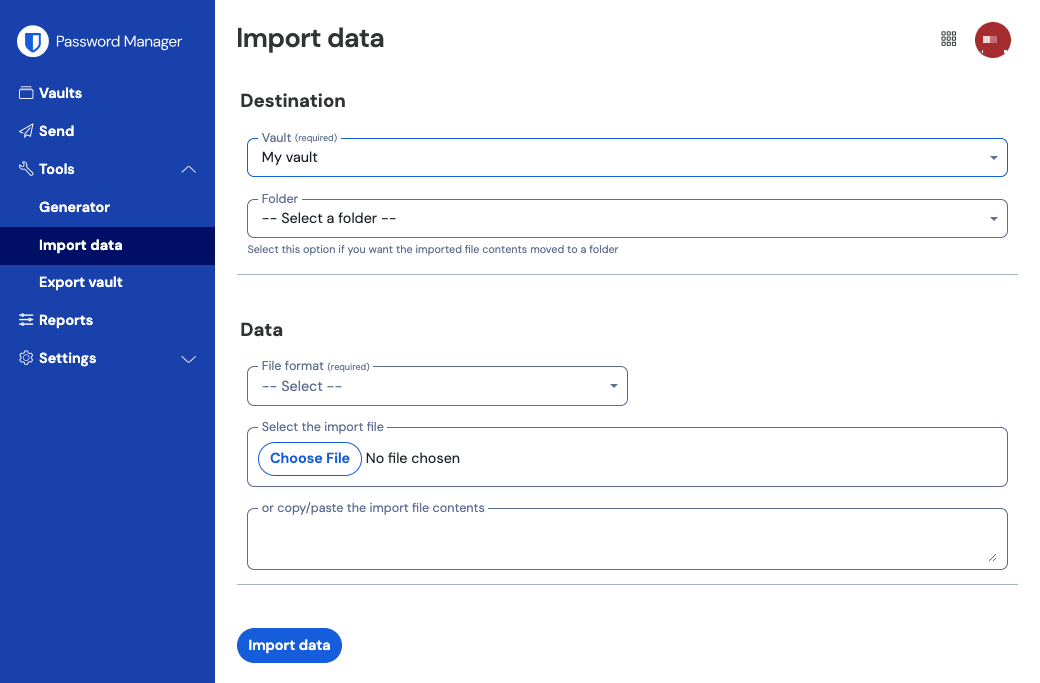
https://your.bitwarden.domain.comif self-hosting.Select Tools → Import data from the navigation:

Import data Complete the following fields from the drop down menus:
Vault: Select the import destination such as your individual vault or an organizational vault that you have access to.
Folder or Collection: Select if you would like the imported content moved to a specific folder or organization collection that you have access to.
File format: Select the import file format.
Select Choose File and add the file to import or copy/paste the contents of your file into the input box.
warning
Importing does not check whether items in the file to import already exist in your vault. If you import multiple files or import files with items already in your vault, this will create duplicates.
Select Import data to trigger the import. If you are importing a password protected
.jsonfile, enter the password into the Confirm vault import window that will appear.After successful import, delete the import source file from your computer. This will protect you in the event your computer is compromised.
Additional items such as file attachments, Sends, and trash will need to be manually uploaded to your vault.
To import data to your vault:
In the Settings tab, select Vault and choose the Import items option.
Complete the following fields from the drop down menus:
Vault: Select the import destination such as your individual vault or an organizational vault that you have access to.
Folder or Collection: Select if you would like the imported content moved to a specific folder or organization collection that you have access to.
File format: Select the import file format.
Select Choose File and add the file to import or copy/paste the contents of your file into the input box.
warning
Importing does not check whether items in the file to import already exist in your vault. If you import multiple files or import files with items already in your vault, this will create duplicates.
Select Import Data to trigger the import. If you are importing a password protected
.jsonfile, enter the password into the Confirm Vault Import window that will appear.After successful import, delete the import source file from your computer. This will protect you in the event your computer is compromised.
To import data to your vault:
Select File > Import data.
Complete the following fields from the drop down menus:
Import destination: Select the import destination such as your individual vault or an organizational vault that you have access to.
Folder or Collection: Select if you would like the imported content moved to a specific folder or organization collection that you have access to.
File format: Select the import file format.
Select Choose File and add the file to import or copy/paste the contents of your file into the input box.
warning
Importing does not check whether items in the file to import already exist in your vault. If you import multiple files or import files with items already in your vault, this will create duplicates.
Select Import Data to trigger the import. If you are importing a password protected
.jsonfile, enter the password into the Confirm Vault Import window that will appear.After successful import, delete the import source file from your computer. This will protect you in the event your computer is compromised.
To import data to your vault from the CLI, use the following command:
Bashbw import <format> <path>bw import requires a format (use bw import --formats to retrieve a list of formats) and a path, for example:
Bashbw import <format> /Users/myaccount/Documents/mydata.csvAfter successful import, delete the import source file from your computer. This will protect you in the event your computer is compromised.
File attachments must be manually migrated to your Bitwarden vault, as they are currently not including in bulk import operations. Please note that storage of file attachments is available only for premium users, including members of paid organizations (families, teams, or enterprise).
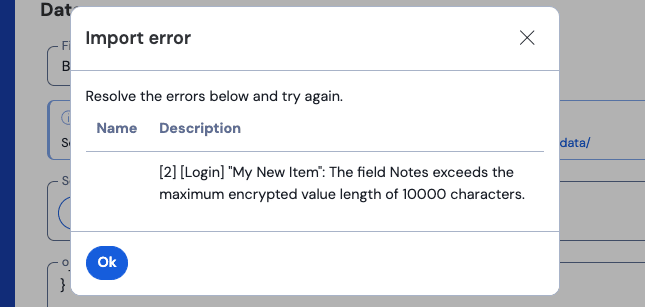
The following error messages, typically received when attempting to import a .csv, indicate that an item in your import file has a specified value that exceeds the allowed encrypted character limit for its field type:

To solve this issue, open the .csv file in a text editor or spreadsheet program and remove or reduce the character count of the offending item. Bitwarden won't import your .csv file until it is free of offenses. The contents of the error messages contain several pieces of pertinent data to help you identify the offending item. For example, in the above example:
[1]identifies the index number where the offending item is located, adjusted to match row numbering in most spreadsheet programs.[Login]identifies the vault itemtypeof the offending item."Facebook"identifies thenameof the offending item.Notesindicates the field (column) where the character limit is exceeded.10000indicates the character limit allowed for that field (column).tip
On import, the character count of any given field is increased due to encryption, meaning that an 8000-character
Notesfield in your.csvwill scale to 10,000+ characters when it comes into contact with Bitwarden, triggering this error. As a rule of thumb, character counts will grow between 30-50% when encrypted.
If you continue to have trouble locating the offending item using the data provided in the error, it may help to focus first on notes as these are frequently the cause of this error.
Imports may be rejected for exceeding any of the following data limitations:
If your import has more than 7,000 items.
If your import has more than 2,000 folders.
If your import has more than 2,000 collections.
If your import has more than 7,000 item-folder relationships (e.g. a single item in 3 folders can be said to have 3 item-folder relationships).
If your import has more than 14,000 item-collection relationships (e.g. a single item in 3 collections can be said to have 3 item-collection relationships).
If you are a user, rather than an admin or owner, importing data to an organization requires that all imported credentials have at least one collection associated with them. To resolve this error, you can:
Select an existing collection that you have Can manage access to from the Collection dropdown on the import screen before importing your data. Doing so will add the items to this collection.
Specify a new collection name for the unassigned items in your import file. Doing so will automatically create that collection and add the items to it. For help conditioning your import file, refer to this article.
note
This error can only occur when your organization has the Limit collection creation and deletion to owners and admins option off, as this will allow users to create and import to their own collections.
Suggest changes to this page
How can we improve this page for you?
For technical, billing, and product questions, please contact support