Guide: How to Create and Store a Backup of Your Bitwarden Vault
Step-by-step guide for creating an encrypted backup of your Bitwarden vault
- Resources
- Guide: How to Create and Store a Backup of Your Bitwarden Vault
Maintaining a backup of your Bitwarden vault plays a critical role in ensuring the security of your secrets and passwords, but comes with the responsibility of managing a file full of very sensitive information. This guide breaks down the steps of one method for creating an encrypted backup of your vault on a USB thumb drive. A backup will prove invaluable if you find yourself unable to log into your Bitwarden account or in some other unforeseen circumstance.
Bitwarden users can download their vaults for use as a backup as well as to import their passwords into another vault. This downloaded vault copy contains all the usernames, passwords, URIs and other details in a human-readable format.
Once downloaded, the backup of the vault can be stored, moved, copied and deleted but remember - this file must be protected as it contains plain-text copies of all the usernames and passwords from the vault. This guide aims to provide a simple and effective way to safely manage this data so that it’s accessible in case of emergency, but remains secure in case it falls into the wrong hands.
What You’ll Need
Before getting started, here’s a list of what’s needed:
Somewhere to store your backup! A USB thumb drive is perhaps the most convenient way to do this and what this guide covers, but any kind of storage media will work just as well
A Bitwarden vault to be exported
Somewhere to store your password
An encryption & decryption tool
Table of Contents
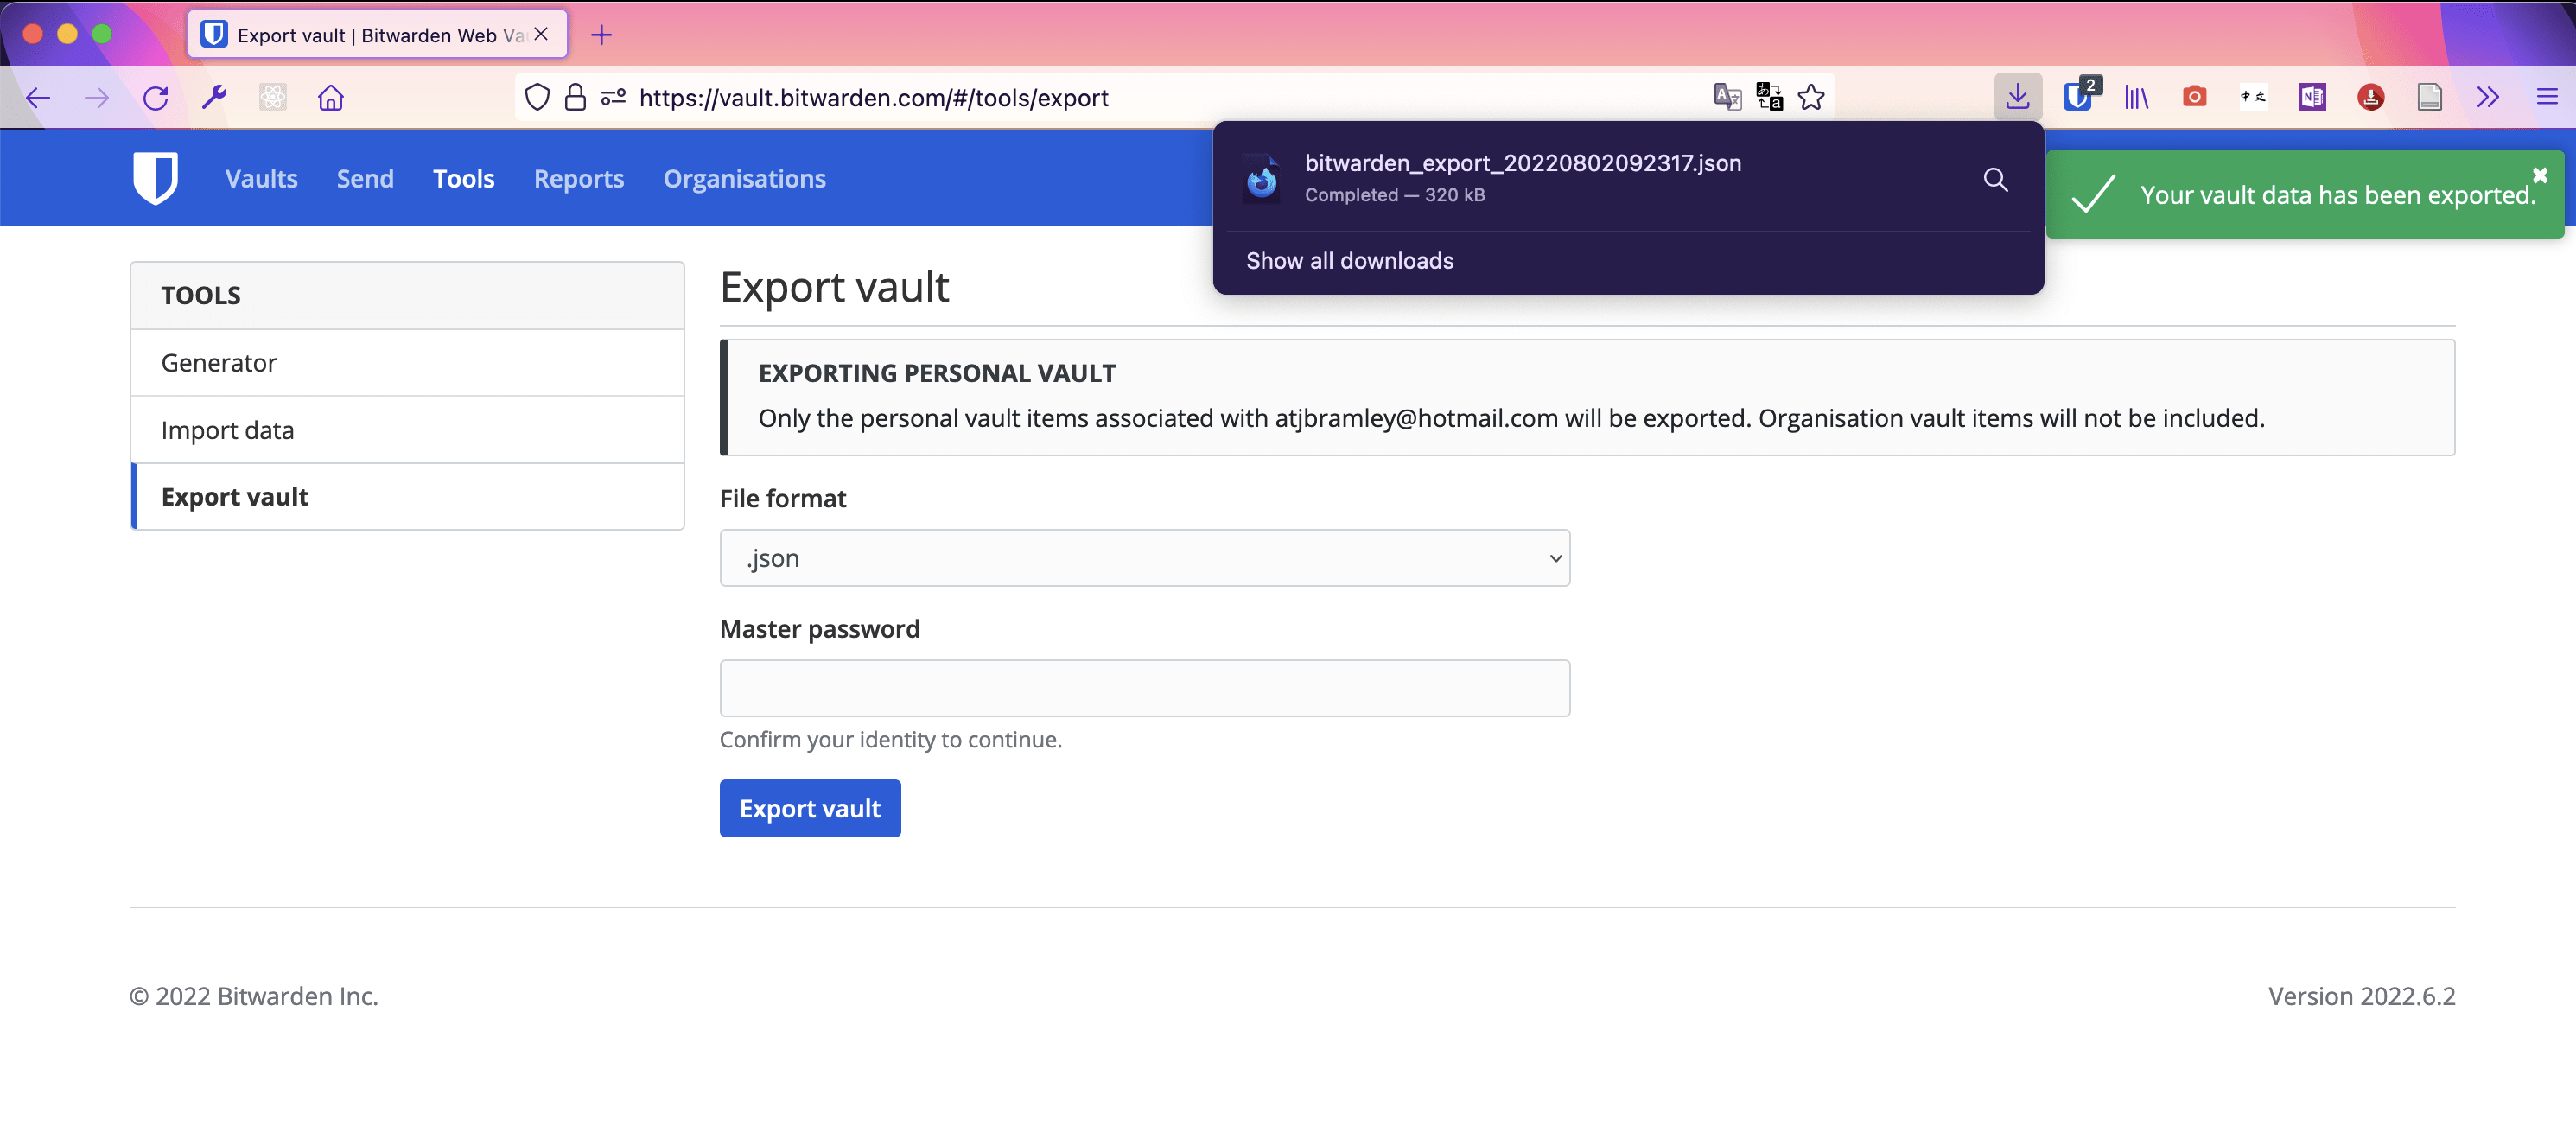
To begin you will need to download your vault, which can be done using the guide here: Help: Export Your Data
Because this vault copy is intended for use as a backup to restore a Bitwarden vault in case of being locked out, it’s best to choose the .json export format. When importing a Bitwarden .json vault file, it will give you a vault identical to the original vault at the time it was exported.
At the end of the export, a .json file will be downloaded to your computer. It’s very important not to forget about this file afterwards! Anybody with access to your computer would be able to open the file and read the entire vault contents, including all the credentials and secrets contained within.
TIP:
Vault exports do not include file attachments, items in the trash or Sends. You will need to export these manually.
What about the .json (Encrypted) option?
The encrypted .json option is a great tool for creating backups! However the files are not human-readable and offer less flexibility (but more security) than exporting an unencrypted file and manipulating that.
The exported files from Encrypted Export can be imported into your specific Bitwarden account only (Account backup) or into any other Bitwarden account (Password protected). They cannot be used by third-party encryption tools, even if you provide them the correct password.
TIP:
Learn more about Encrypted Exports in the Help Center!
The safest way to store a backup is to have the sensitive file stored on some sort of encrypted media, such as a USB thumb drive.
You have two main options when preparing your media:
Encrypt the entirety of the media: nothing on the media will be visible without the correct credentials
Encrypt only a portion of the media: the unencrypted portions of the media will be visible to those without the correct credentials, but the encrypted volume will be reserved for those with the password
For the purposes of storing your vault backup, a useful technique is to create an encrypted volume onto an unencrypted USB drive (instead of encrypting the whole drive). This ensures that the USB stick is detected normally by computers, and allows for storage of unencrypted files and folders alongside the encrypted files.
The unencrypted space can then be used to store instructions such as where to find the decryption password, and copies of the decryption tools for macOS and Windows. The benefit is that a user plugging the drive into their machine five years in the future, long after they have forgotten the purpose of the backup, will immediately understand the contents and how to use them. An unauthorized user on the other hand will understand the contents, but will not be able to access them as they will lack the required credentials.
Most USB thumb drives come preformatted and ready for your computer to use. If it has not or you would like to change advanced file settings, the following section provides an explanation and instructions on how to do that.
All storage designed to be read by computers must use one of many file systems. Popular file systems include FAT, exFAT, APFS, ext4, and NTFS amongst others. The filesystem on a device gives instructions to the computer as to what, where, and how to access files that are contained on the device. Different operating systems prefer different file systems, e.g. a Windows PC probably uses NTFS, whereas an Apple device probably uses APFS. Different devices cannot always easily read file systems that they are not designed to use.
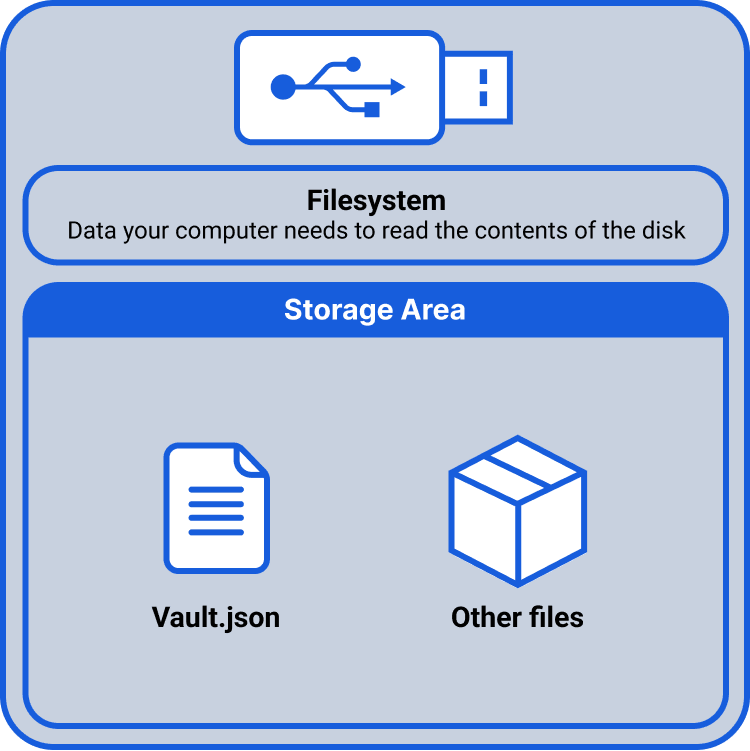
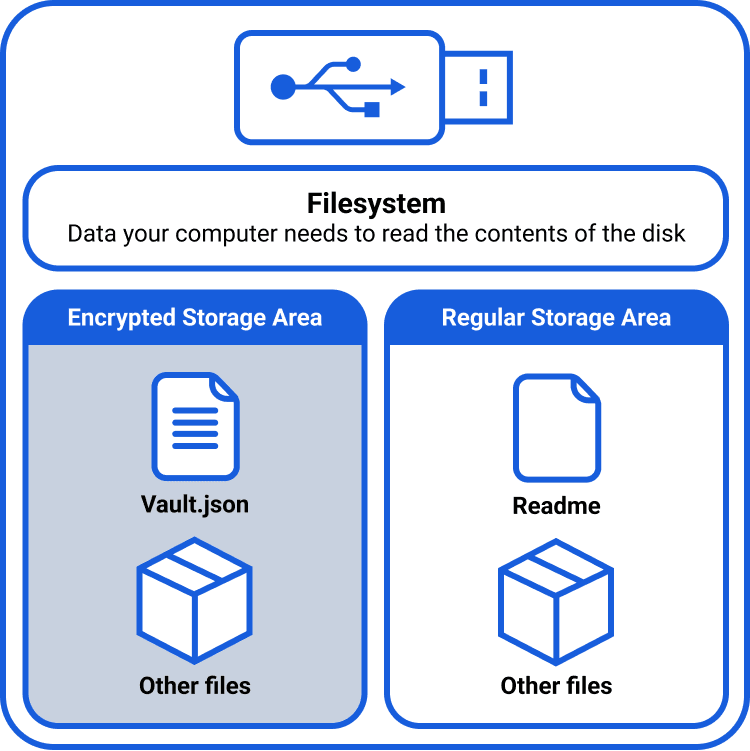
When preparing your USB drive, you will be asked to select a file system. For the reasons stated above, no matter whether you’re using macOS or Windows (or Linux), it’s probably best to format the USB stick using the exFAT file system and the GUID partition table. exFAT is a good balance between modern features and compatibility. These options will ensure that your USB drive will work on pretty much any machine that you plug it in to.
It is best practice to use a cleanly formatted USB drive. Guides for both macOS and Windows can be found easily online.
Important!
Formatting a USB drive will delete everything stored on it!
Once we are in possession of our freshly formatted media, it’s time to use an encryption tool to either encrypt the entire USB drive, or to create an encrypted volume on the drive.
Encryption tools are common in computing today, and serve many useful functions. The traffic that you send via the web is routinely encrypted to ensure that nobody gaining access can read it, and the entire hard drives of many entire computers and phones are encrypted so that the data will remain secure should the device be lost or stolen.
Bitwarden recommends using a tool that can encrypt and decrypt a small collection of files, as well as an entire device (USB drives, internal drives, etc). Once encrypted, this device will be used to store your Bitwarden vault export.
There are many encryption tools available on the internet. Popular options include VeraCrypt, PeaZip, and 7-Zip for file storage, though many more exist. This guide will detail how to use both VeraCrypt and PeaZip to backup your Bitwarden vault.
PeaZip, VeraCrypt, and 7-Zip are third-party programs and are not supported or endorsed by Bitwarden. You must complete your own due diligence and agree to their terms of service before utilizing them.
VeraCrypt has an excellent first time tutorial to follow, which can be found on their website.
In order to prepare your USB drive, you should follow the VeraCrypt tutorial, but take note of the following recommendations:
In order to be able to place unencrypted files alongside the encrypted Bitwarden vault (as opposed to encrypting the entire USB drive), the ‘Create an encrypted file container’ option should be chosen at Step 3.
When you are asked to create a password, this should be a different password from your Bitwarden vault master password. We will discuss where to safely store this password later in the article.
Once you’ve completed the Final Step of the VeraCrypt tutorial, you’ll be ready to back up your files onto your newly encrypted media!
Transferring your vault to your VeraCrypt encrypted media
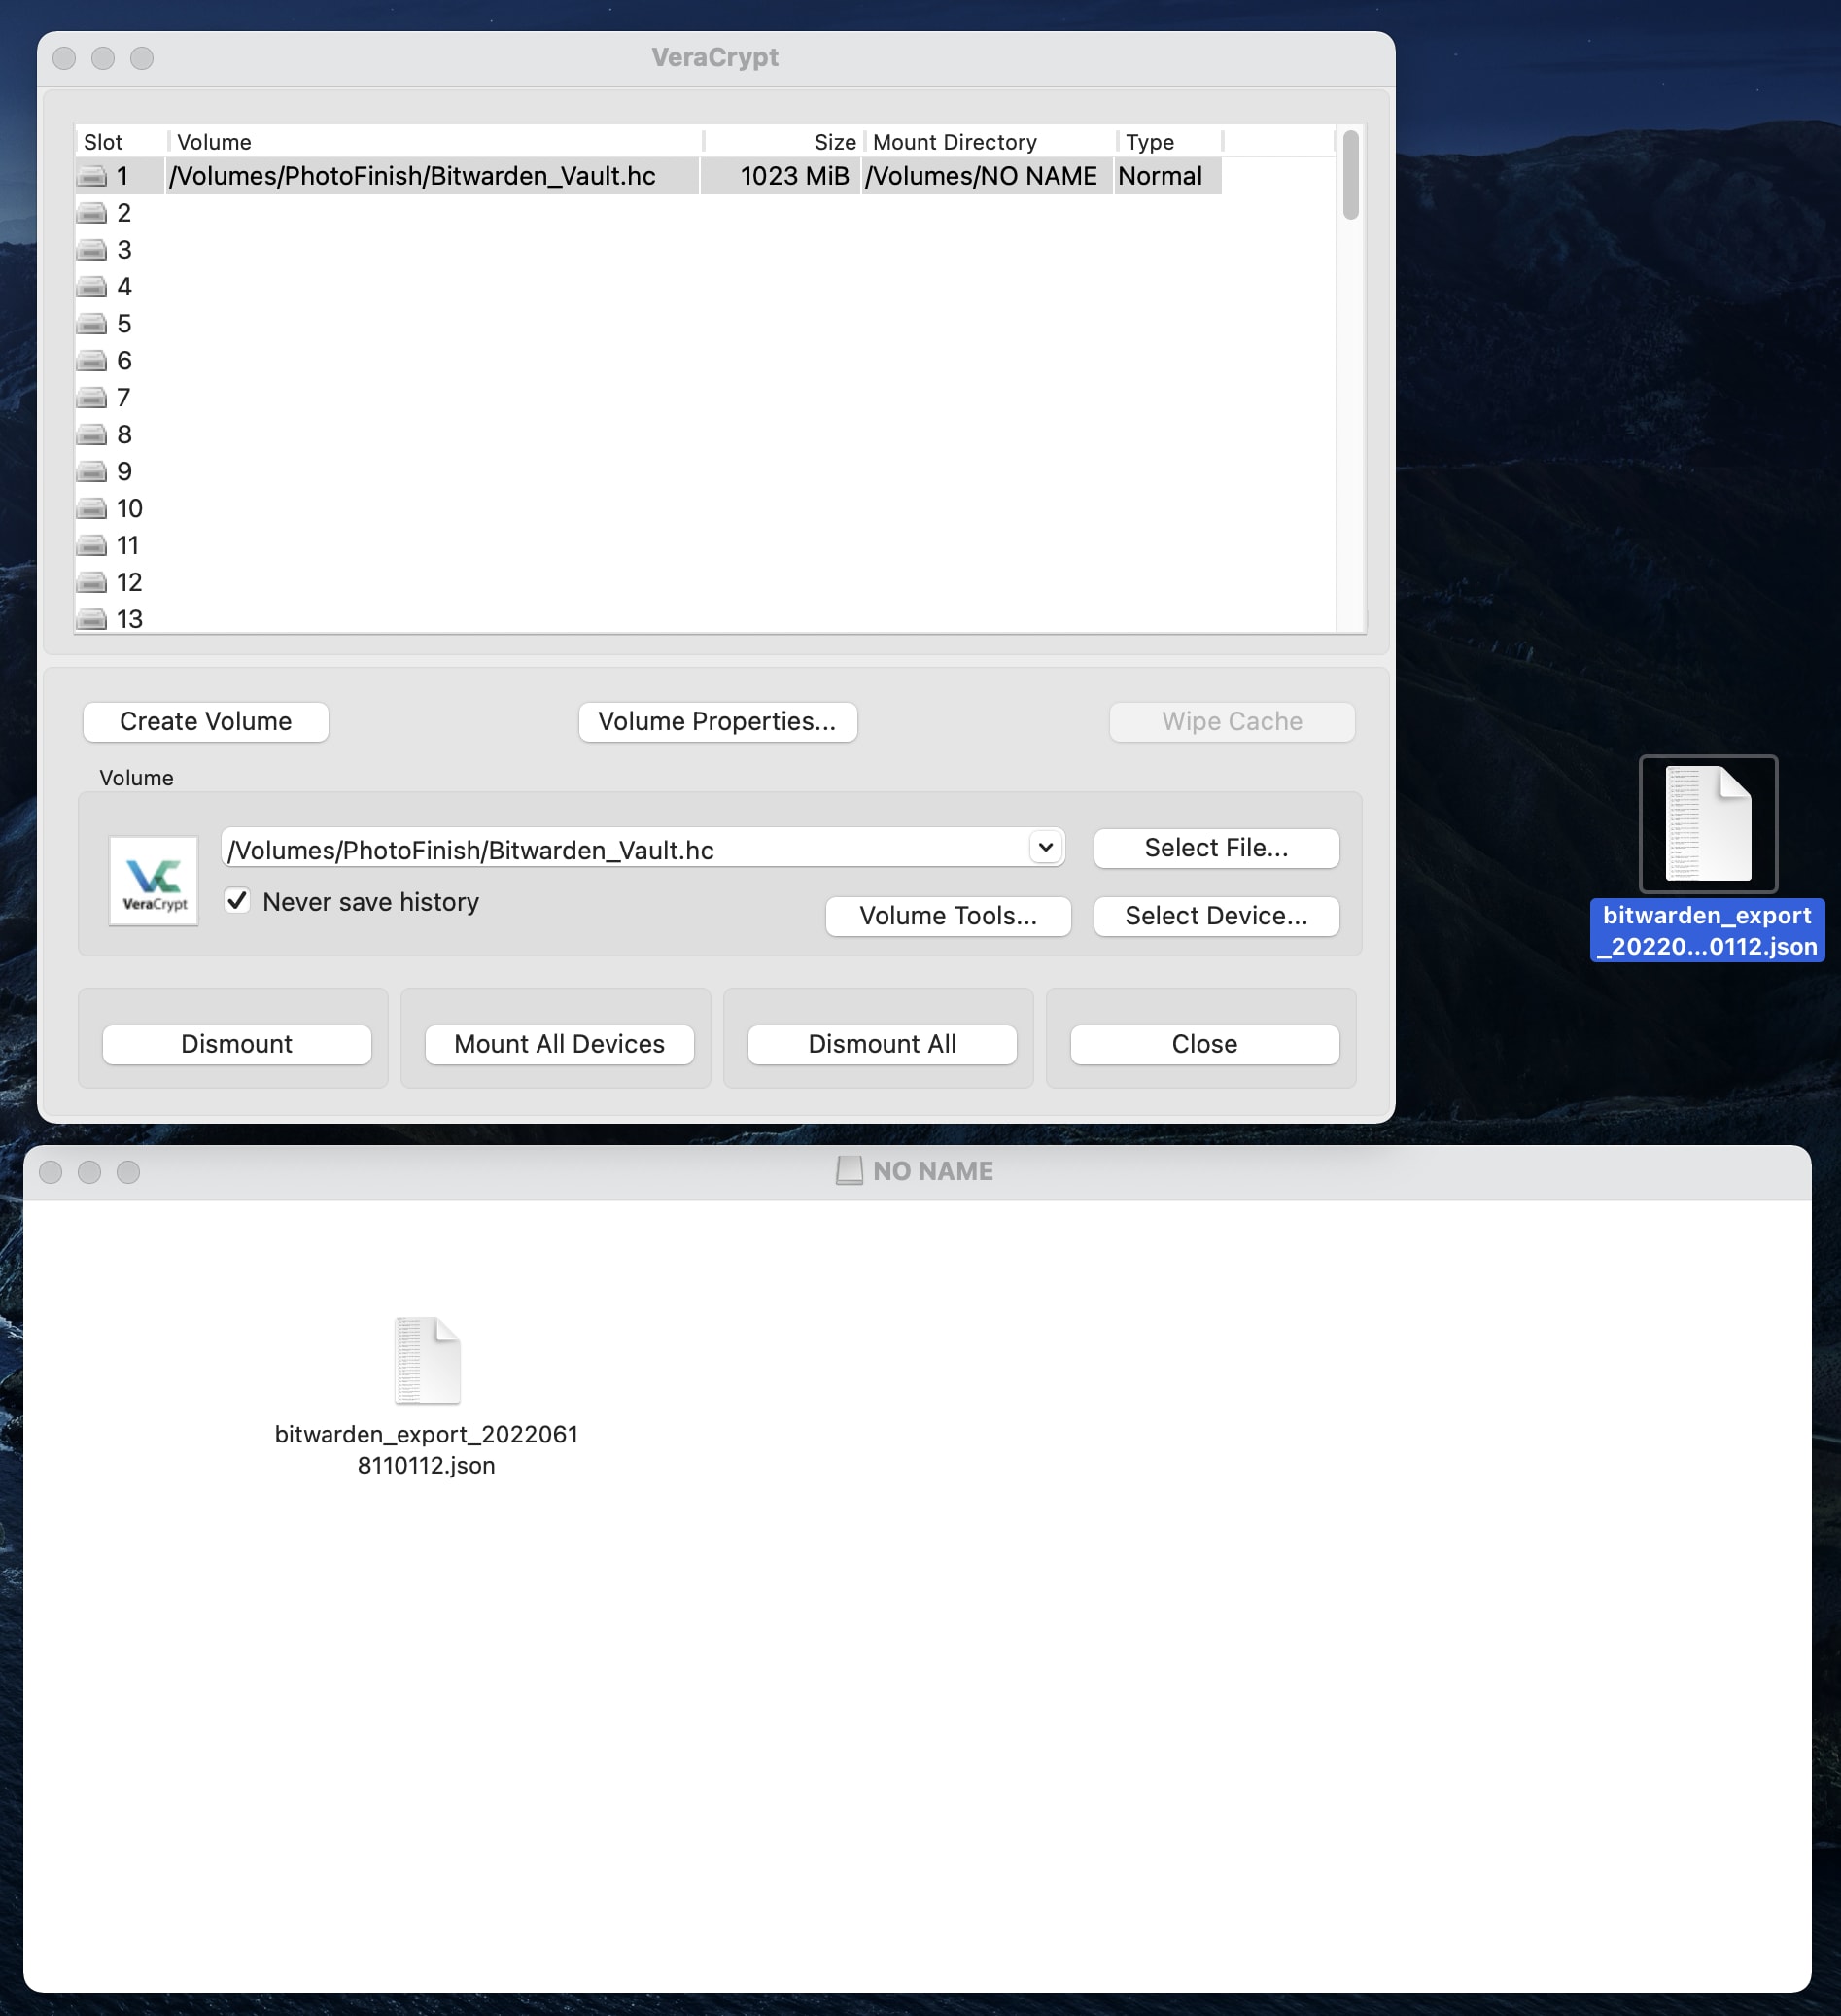
You should now have available in your File Explorer / Finder a USB drive, which has space for unencrypted content, while also containing an encrypted volume. Note that the encrypted volume appears as a separate drive, despite actually being a “folder” located on the USB drive.
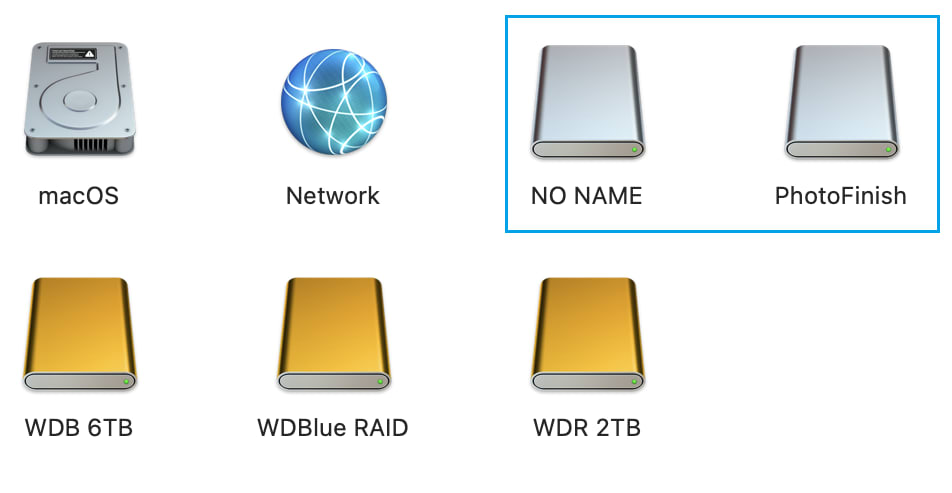
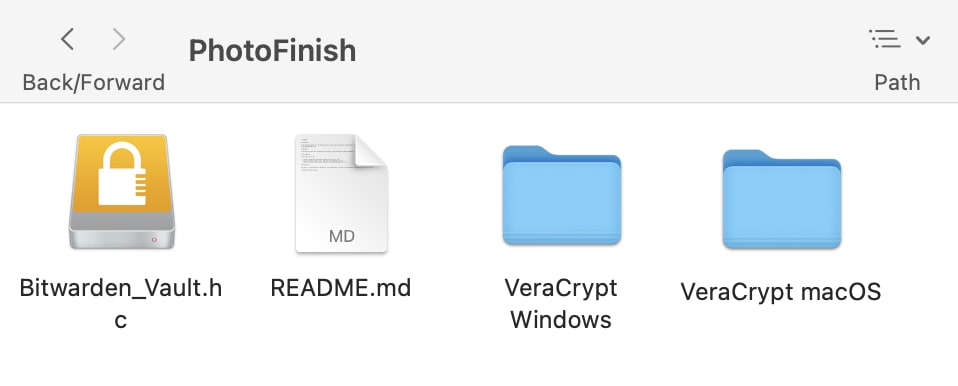
Copy the file from your computer to the new encrypted volume. NOTE: It is critical that you store your vault inside the encrypted volume (NO NAME), and not the non-encrypted volume (PhotoFinish in the below example case):
PeaZip is another choice for creating an encrypted zip file, into which you can place your vault export, as well as any other files that you would like to store securely.
Firstly, download and install peazip following the instructions found at https://peazip.github.io/
Once the program is opened, select the Add menu button, and then choose Protect with password, 7Z format from the dropdown that appears:
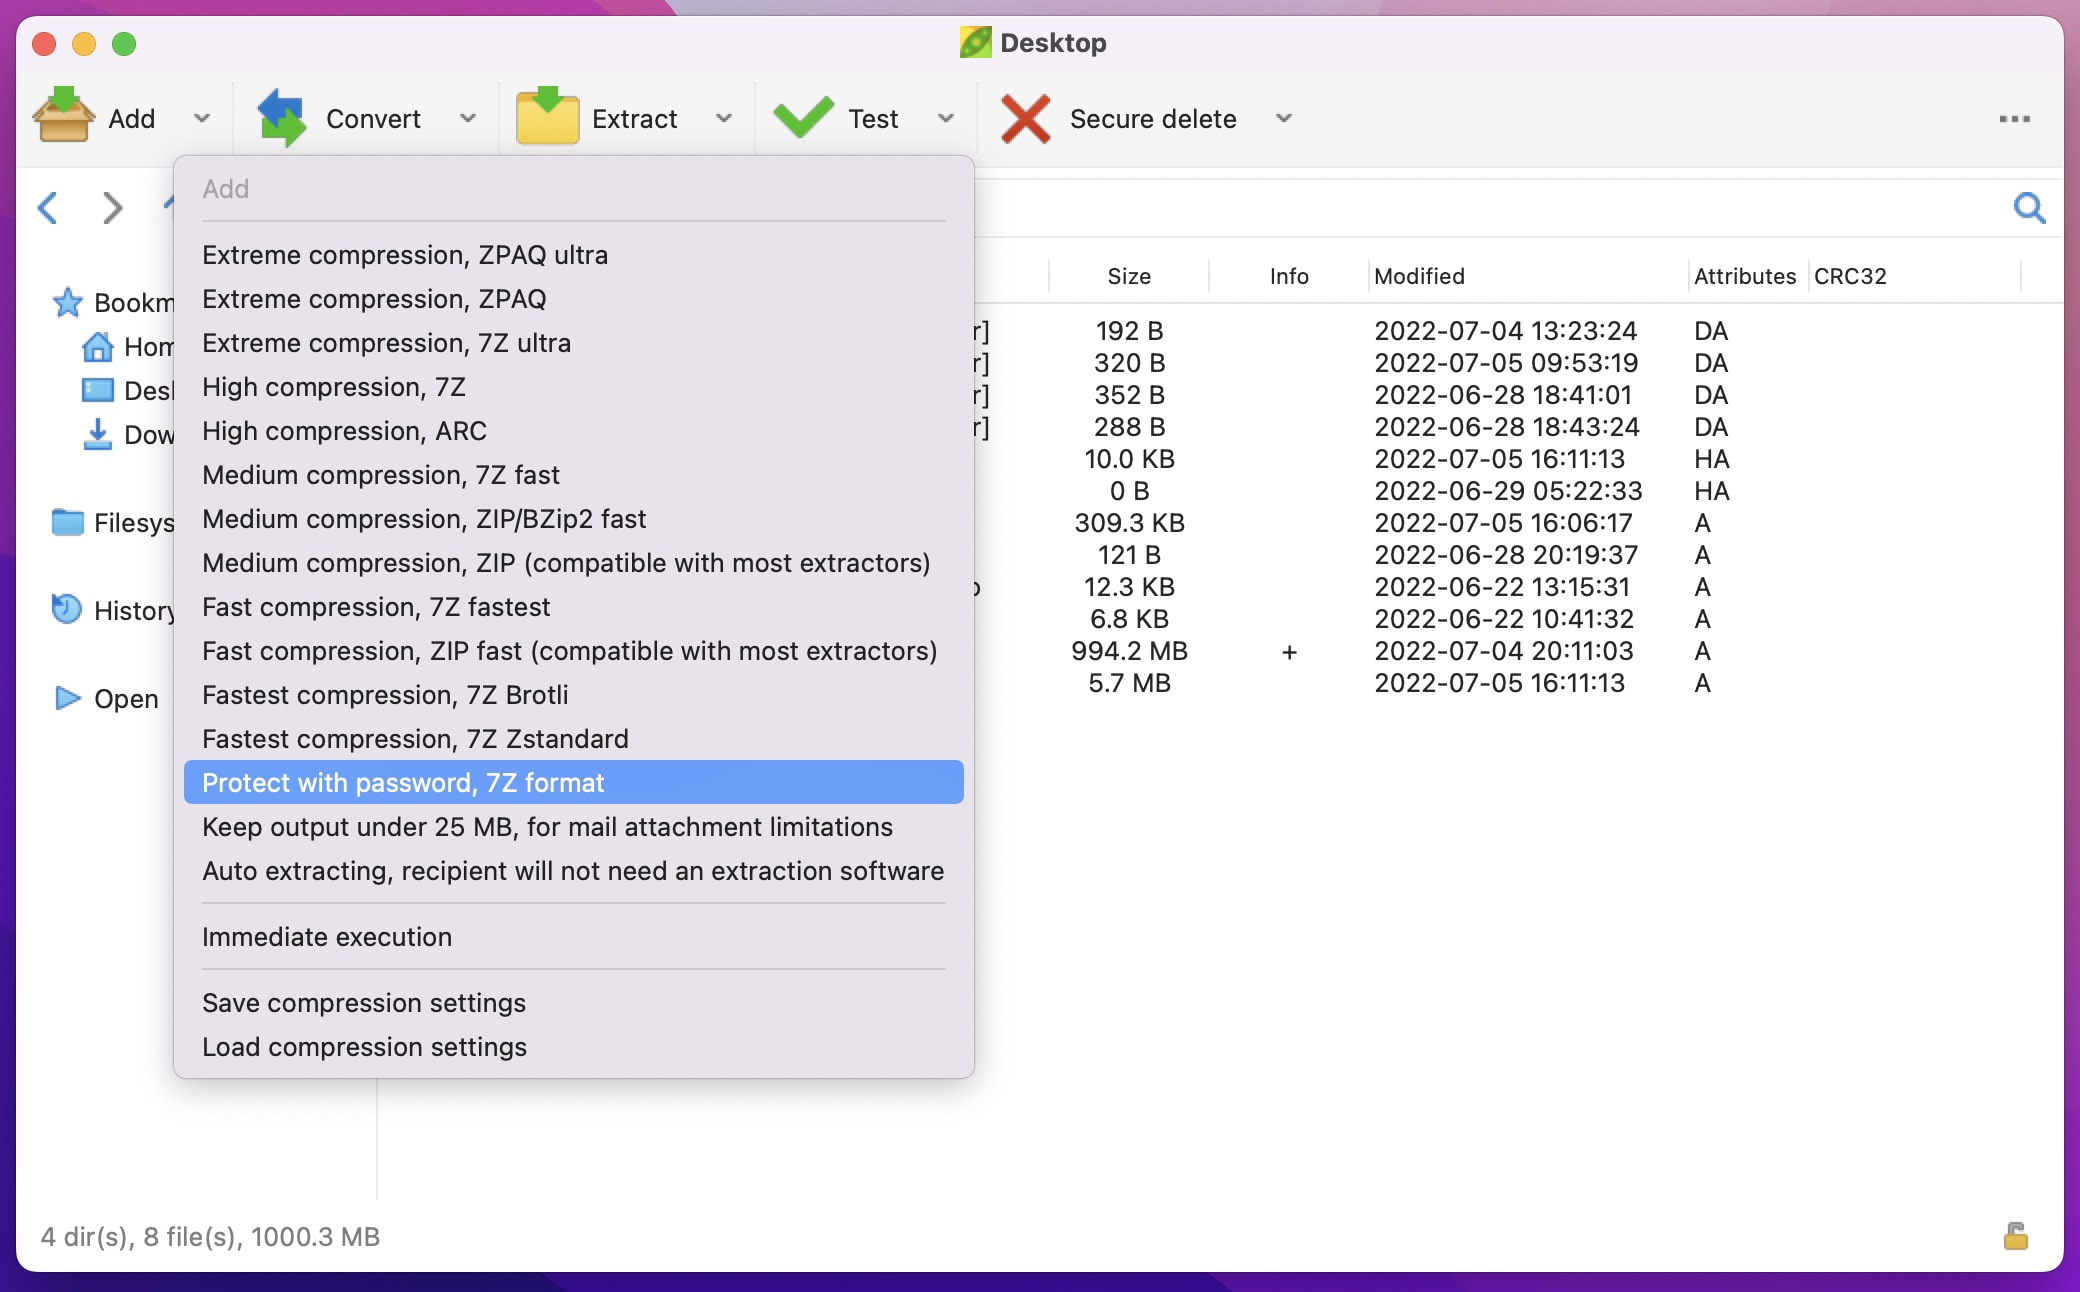
You will be prompted to create a password for your encrypted zip file. Please ensure that you use a different password from that protecting your Bitwarden vault!
Once this is done, you can drag and drop your Bitwarden vault export file, along with any other files that you wish to be securely stored, into the PeaZip storage area.
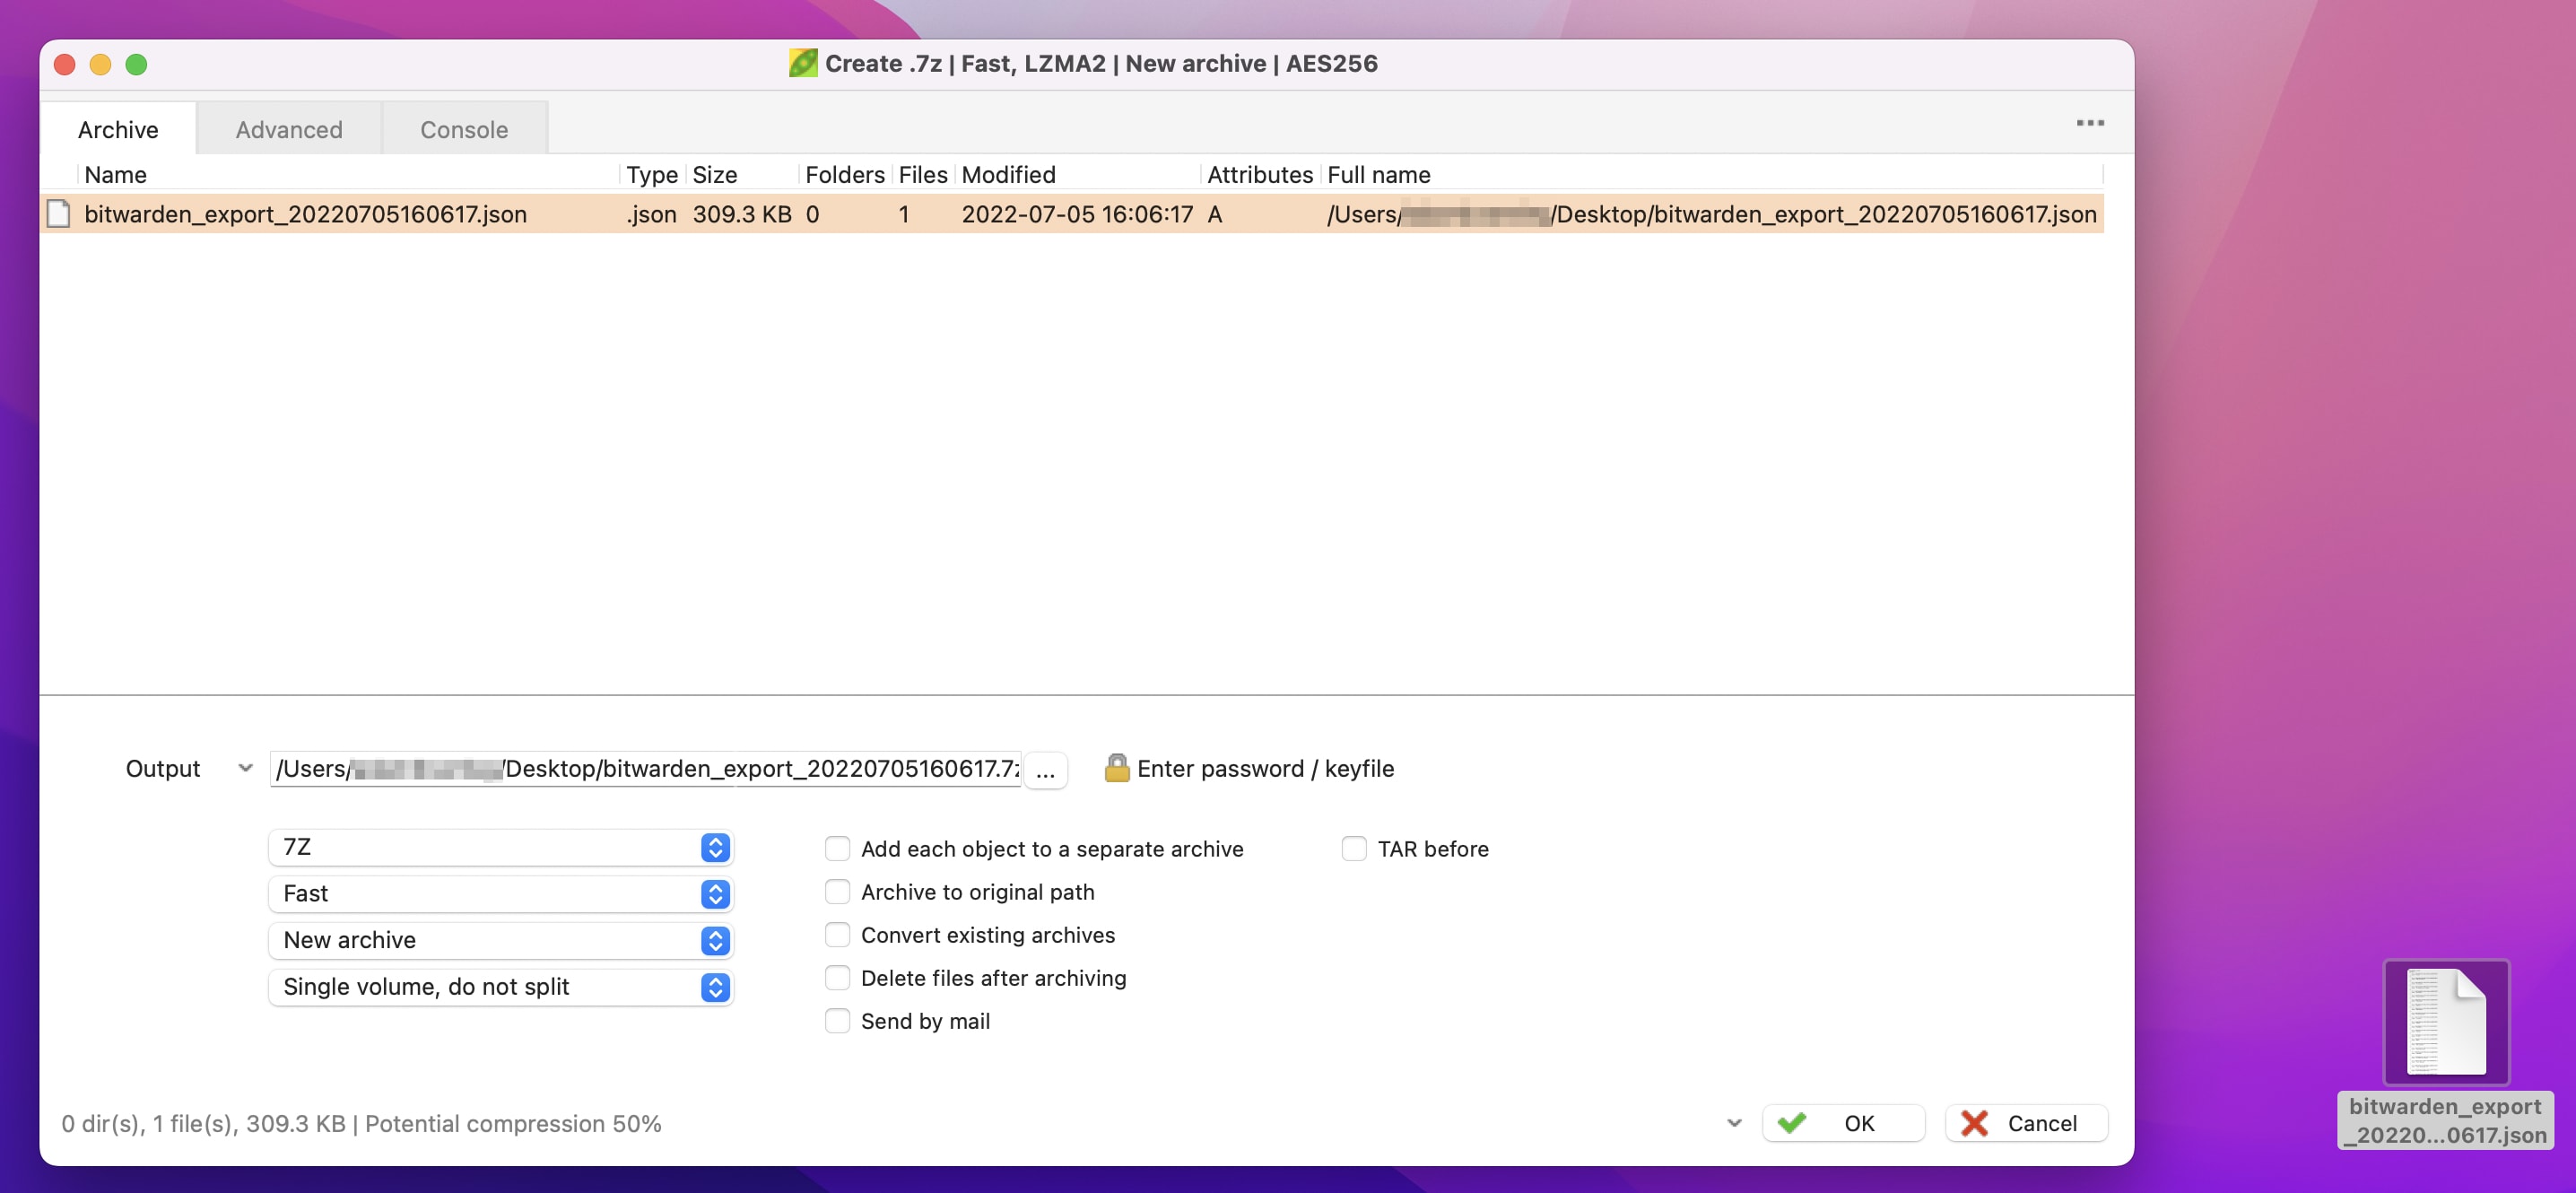
Clicking the OK button will create the password protected .7z file, ready for copying onto your USB drive.
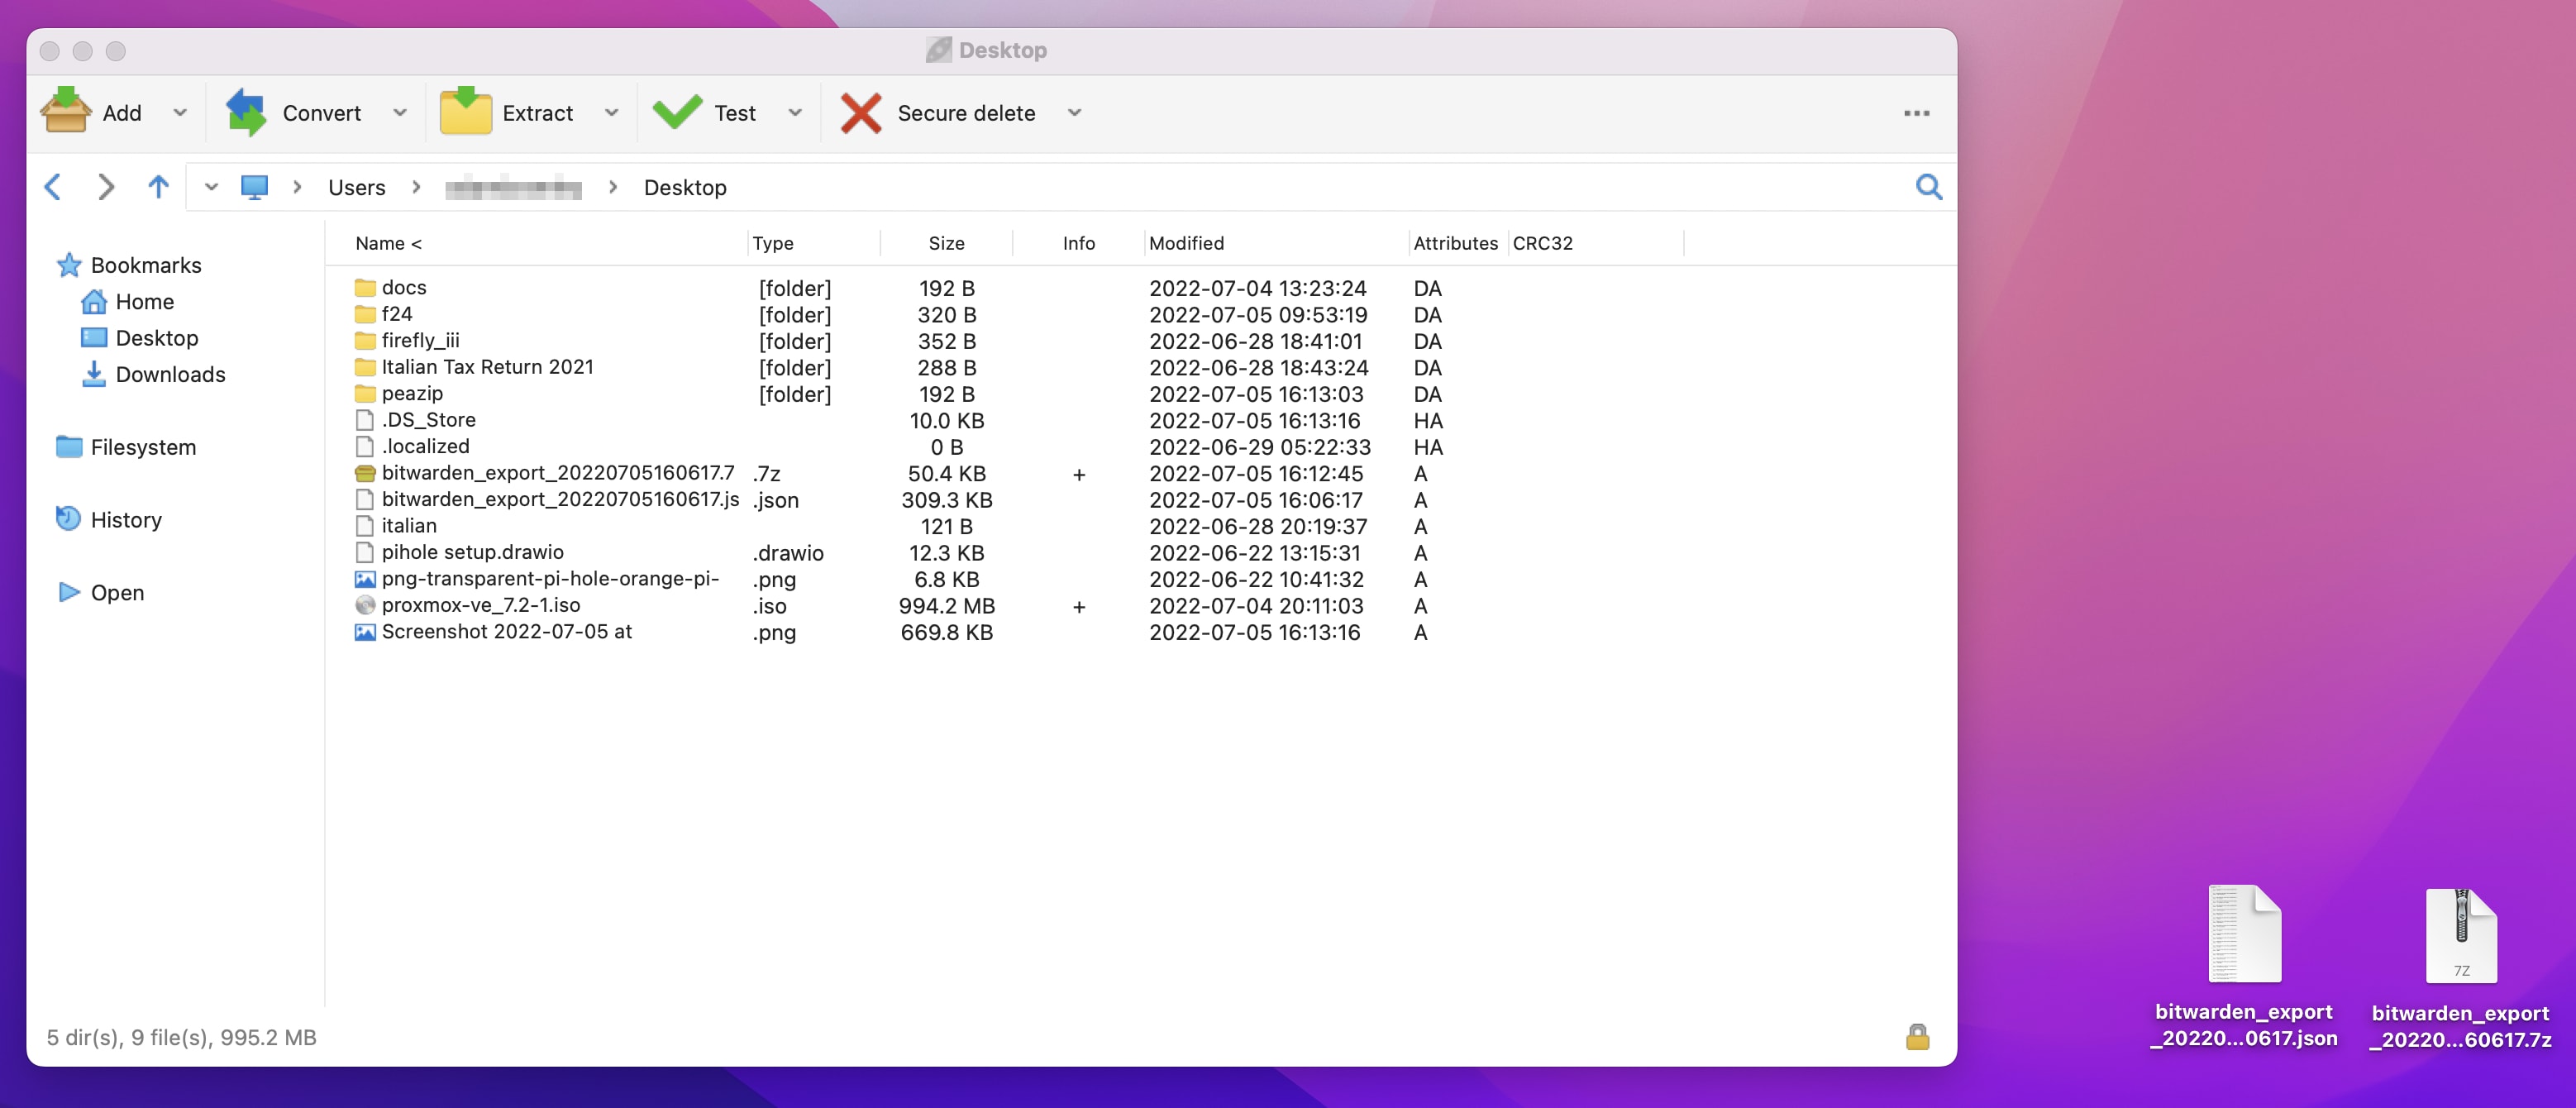
As with any secure file, you should always test that the password functionality has worked, i.e. that you can unlock the secure archive, and also that you are actually requested to enter a password to view your files!
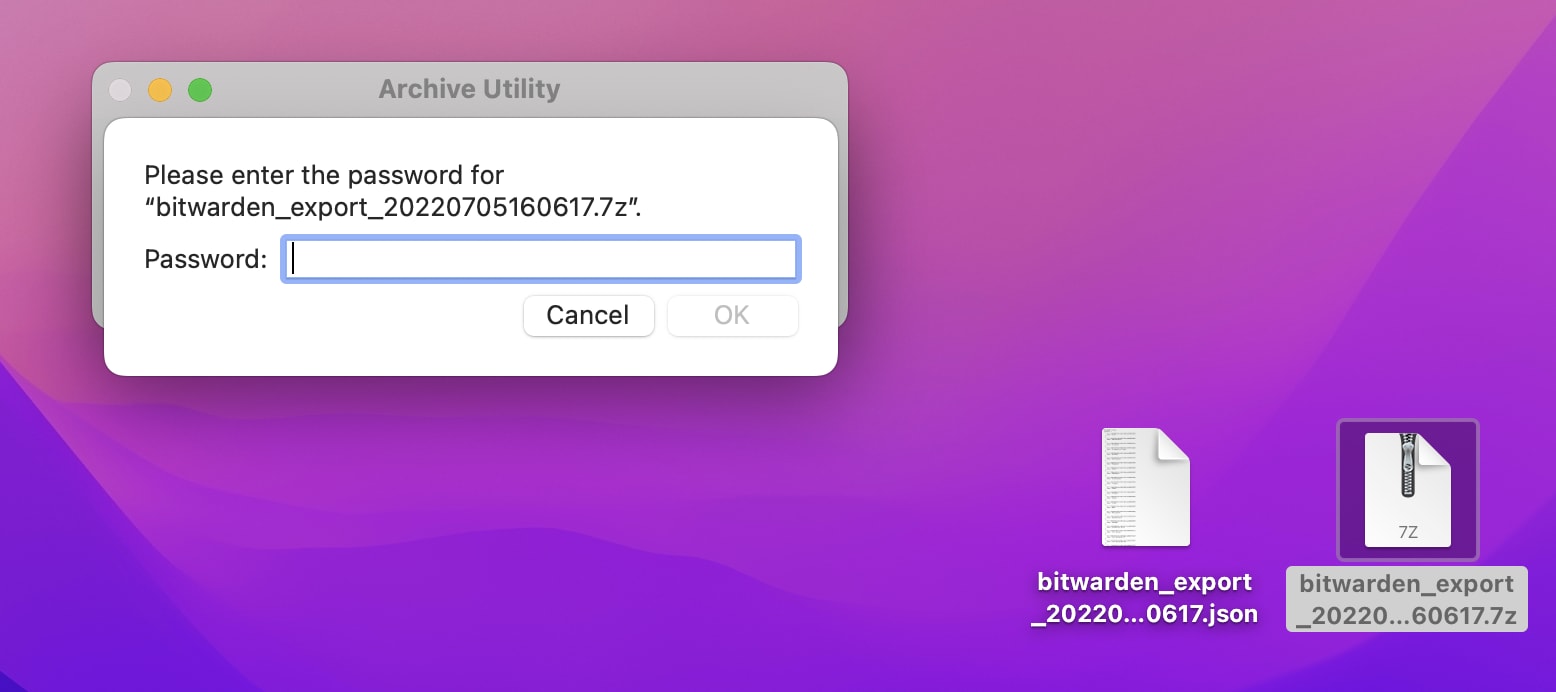
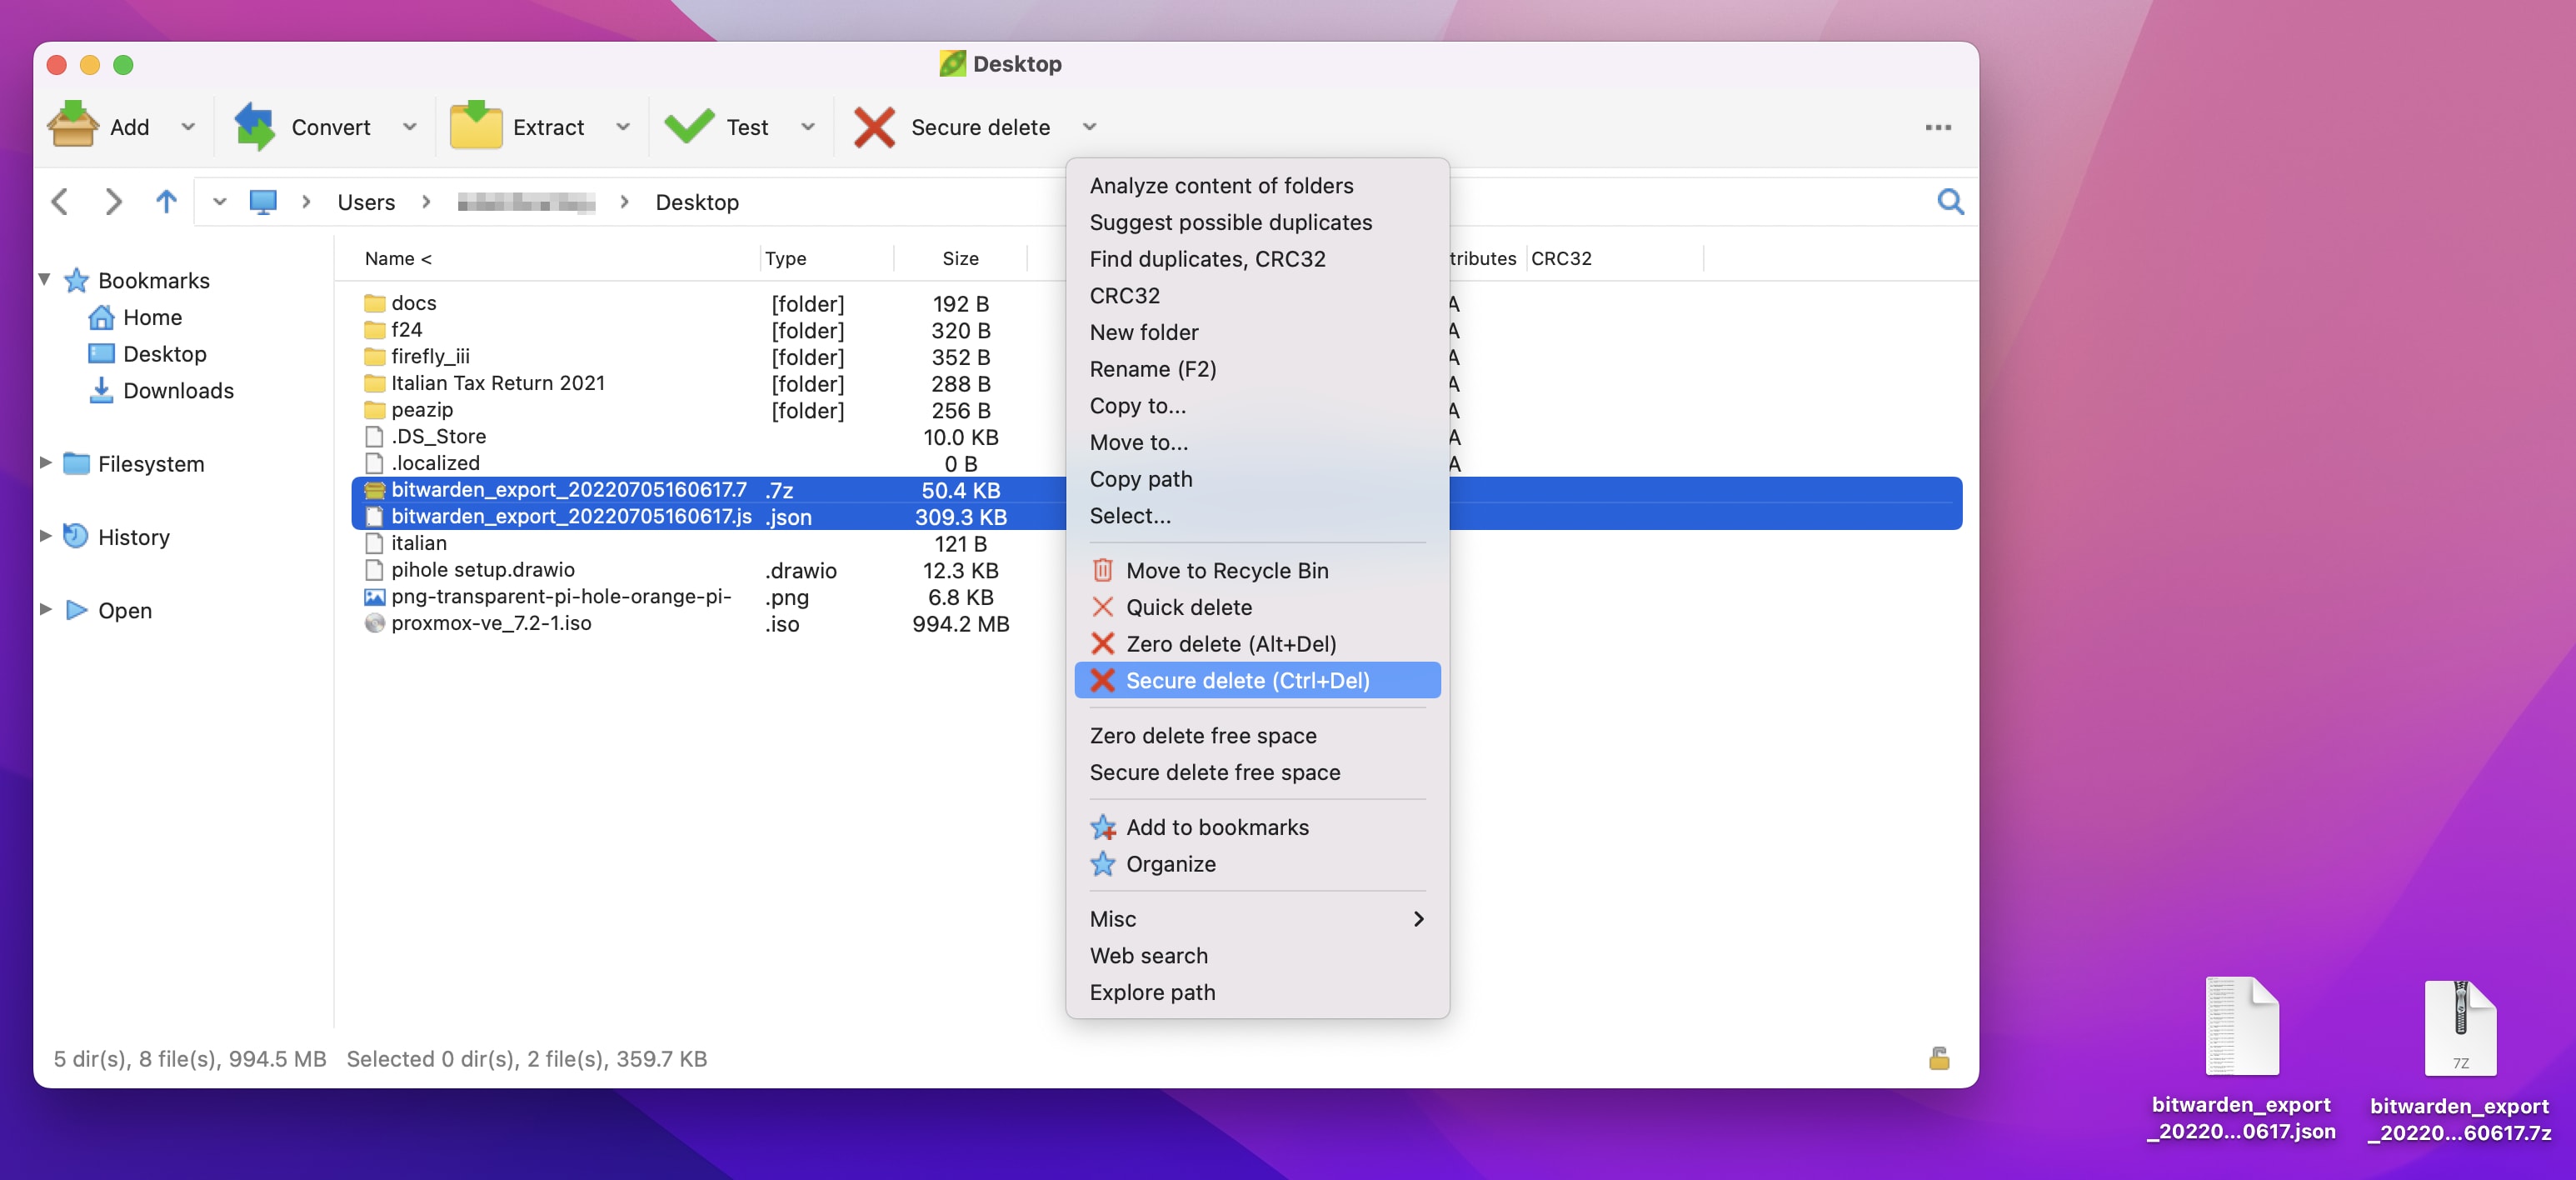
PeaZip also features a useful Secure Delete function that can be used to ensure that your vault export is not retrievable once deleted. In the below screenshot, it is being used to delete both the unencrypted vault export and the encrypted copy on the mac desktop, after the file has been copied onto the USB drive.
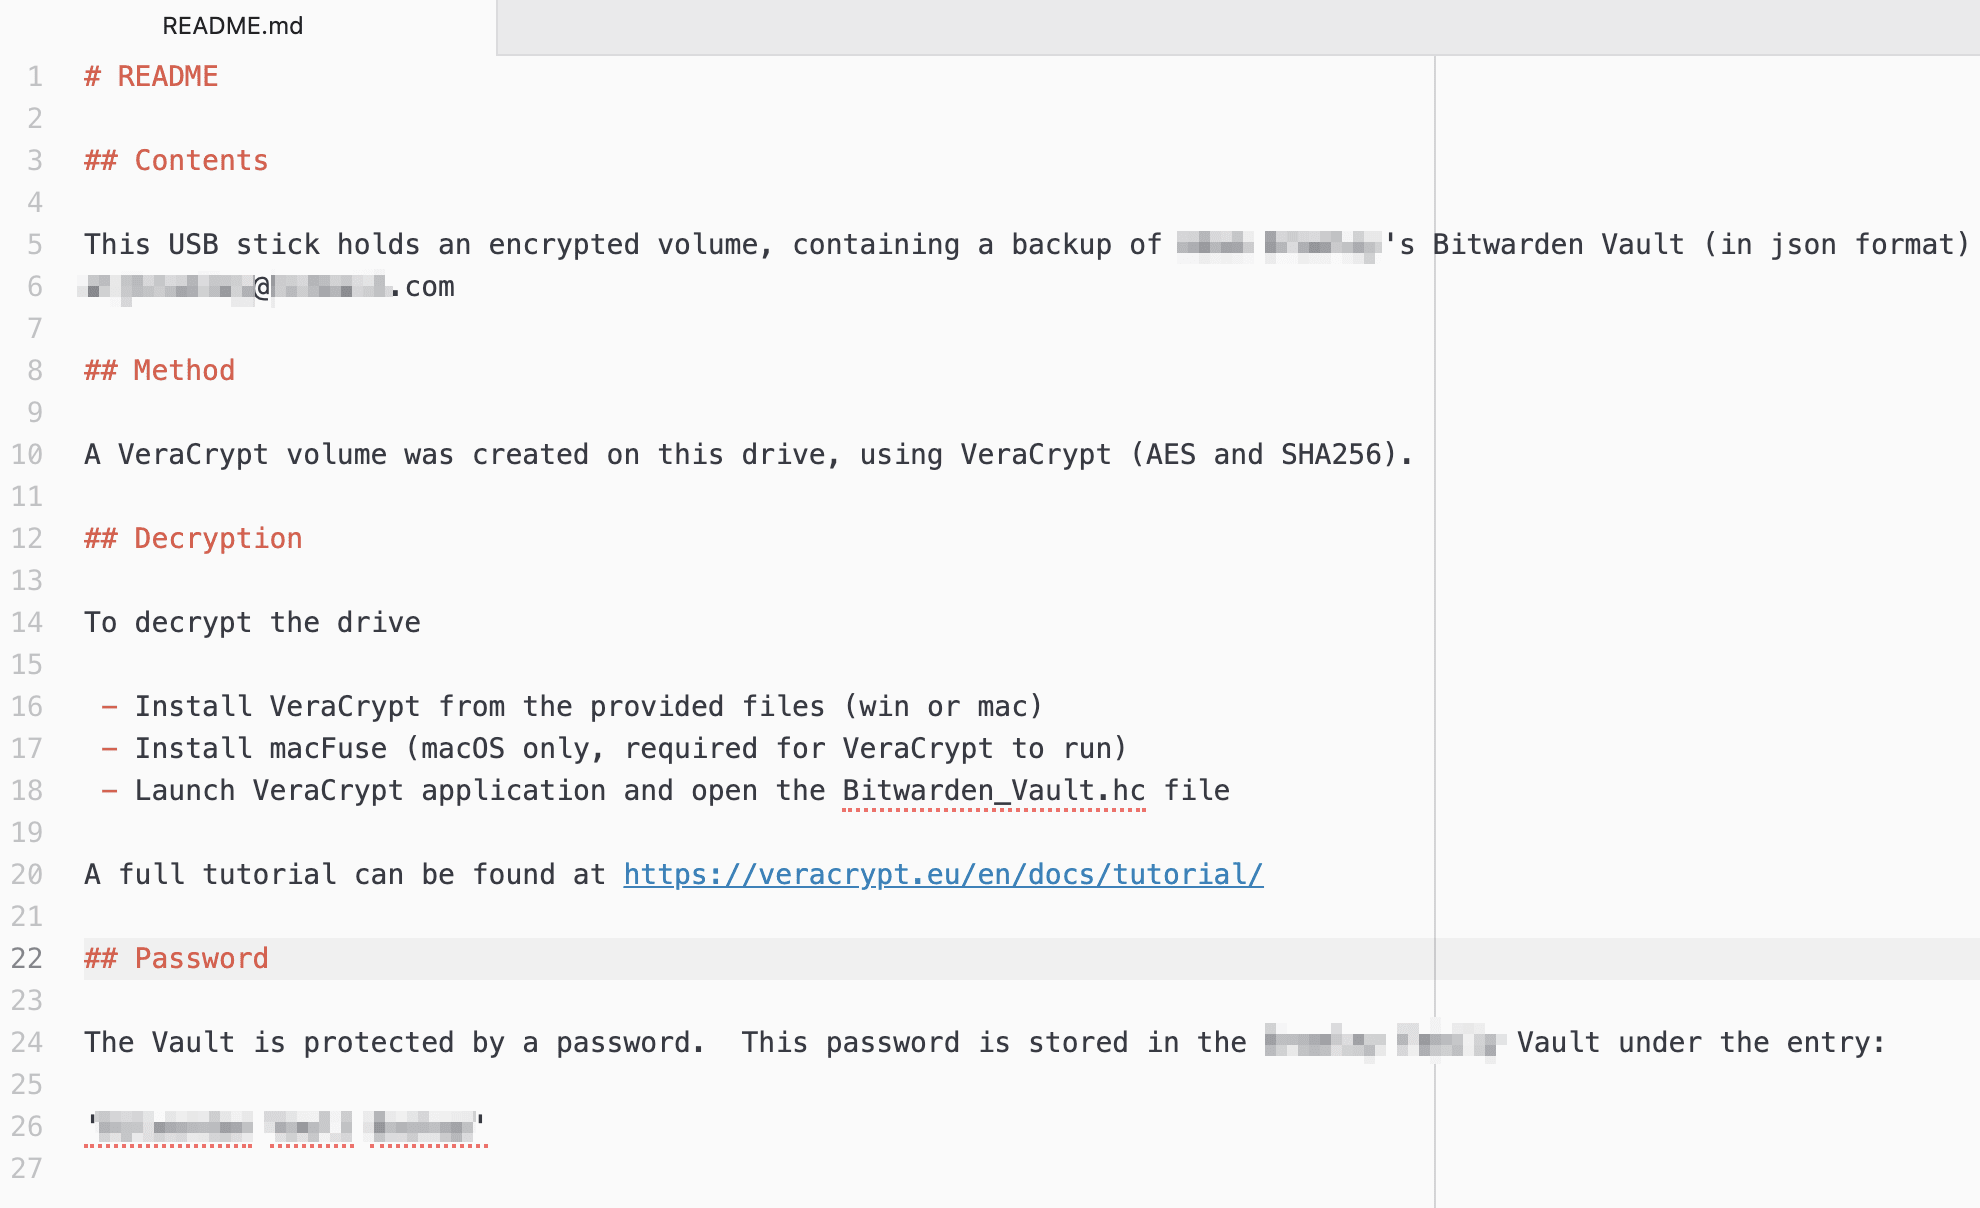
In the above examples, a README file has been placed into the non-encrypted storage, available to anybody plugging the drive into their computer without the password. In addition, downloaded copies of the encryption tool for Windows and macOS have been placed on the stick for convenience.
There are a lot of good options (and a lot of animated discussion!) as to where to store the password to your encrypted vault backup. Here are some popular suggestions from the community:
In the Bitwarden vault of a trusted family member or friend
Physically printed, and stored somewhere like a safe or a bank vault
In the form of concatenated answers to questions contained in the README
The last option is interesting, as it potentially frees you up from having to store your USB-Stick password anywhere at all! For example, your README could contain a statement similar to:
The decryption key is the answers to the following questions, separated by ‘-’ characters. There are no spaces between the answers and the answer is entirely lowercase.
Q1, What is the best password manager?
Q2, Where did you live in December 2008? (Country)
Q3, What is your favorite color?
Q4, What is the more adventurous form of your favorite sport?
Q5, What is your favorite animal?
And an example password based on the above would be:
bitwarden-china-orange-splitboarding-horse
It is important to test your newly created backup before you need it - both that it can be decrypted by those with appropriate credentials, as well as that it cannot be read by those without!
Try plugging your USB stick into a different computer, and ensuring that your vault backup has not been inadvertently left in an unencrypted format. You should test not only that the vault backup is accessible, but also that your password is needed in order to view it!
You now have a USB drive with an encrypted Bitwarden vault and the password to decrypt it! With safe storage of the vault and key, you will benefit from excellent protection that will help to ensure continued access to your online identities.
It is feasible however, that this backup could also let you down in some way. You could lose access to your stored password if that trusted family member or friend forgot their own vault master password, or if the USB drive was lost or damaged.
A simple solution to this would be a second vault backup, using a second password storage method. This time, the password could be stored in a different friend’s vault, or printed and stored in a second location.
Remember that original copy of the vault that we downloaded?

It needs to be deleted carefully. Make sure that you take a moment to not only delete it from your desktop, but also to erase it from your recycle bin and trash folder, so that it can’t simply be restored and read by anybody with access to your computer.
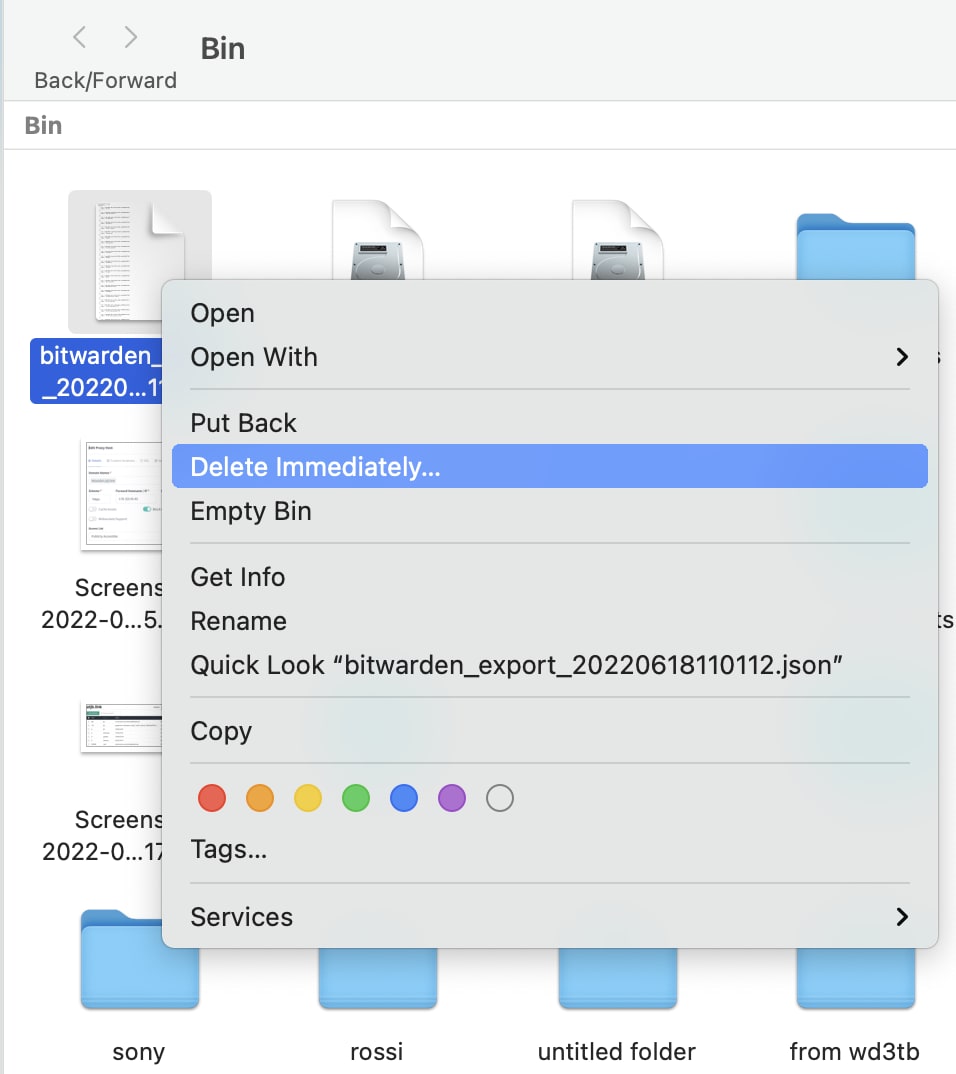
And there you have it! Your vault is backed up and that backup is secure. Rest easy knowing that your online accounts are safe, secure, and that you’re ready for anything!
Get powerful, trusted password security now. Pick your plan.
Free
$0
per month
Free Forever - no credit card required!
Get a Bitwarden vault
- Unlimited devices
- Passkey management
- All the core functions
- Always free
Share vault items with one other user.
Premium
Less than$1
per month
$10 billed annually
Enjoy premium features
- Integrated authenticator
- File attachments
- Emergency access
- Security reports and more
Share vault items with one other user
Families
$3.33
per month
Up to 6 users, $40 billed annually
Secure your family logins
- 6 premium accounts
- Unlimited sharing
- Unlimited collections
- Organization storage
Share vault items between six people
Pricing shown in USD and based on an annual subscription. Taxes not included.
Teams
Resilient protection for growing teams
$4
per month / per user billed annually
- Secure data sharing
- Event log monitoring
- Directory integration
- SCIM support
Includes premium features for all users
Enterprise
Advanced capabilities for larger organizations
$6
per month / per user billed annually
- Enterprise policies
- Passwordless SSO
- Account recovery
- Self-host option
Includes premium features and complimentary families plan for all users
Get a quote
For companies with hundreds or thousands of employees contact sales for a custom quote and see how Bitwarden can:
- Reduce cybersecurity risk
- Boost productivity
- Integrate seamlessly
Bitwarden scales with any sized business to bring password security to your organization
Pricing shown in USD and based on an annual subscription. Taxes not included.